Tuesday, December 22, 2009

Physics Sticks


I just worked out a path that I'm happy with for the design of one of my long-time favorite toys, juggling sticks. These are FAST, and feel almost mathematical when you use them. If you catch them just right, they will be found to be singing on the control stick. They would suck for a beginner perhaps, but wow! Earlier this month I ordered some materials for them and I've been playing with different ways of putting them together. This is carbon, silicone, webbing, and merino. I'm keen! And these are by way far, the absolute fastest sticks I have ever used. Previous designs of mine were fiberglass, latex, and tennis balls. The webbing is hot because the weight is totally adjustable.


Wednesday, December 02, 2009

And then there were two

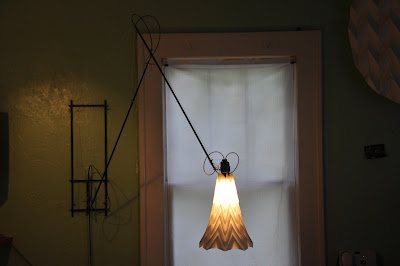
I've been developing these counterweighted lamps for about 2 months now. It started when our couch became an epicenter for handwork. I have always worked on various things there, but the fact that our friends started knitting and drawing there meant that we needed more specific lighting to accommodate the detailed work. I made the first one and started on the second one right after it was done. The second time around, it went a lot faster to do the arm. My sitting and staring time was far reduced because I'd already designed the fittings for the arm. The base was a different story. I wanted to move away from the wood base in the first lamp and make one using a consistent set of materials - carbon tubes and stainless wire. I figured this would unify the design, and I think it has. The next one will have a more shapely base, although I do enjoy this one.


I use the beautifully precise bearing in dead hard drives for the main counterweight - I strip parts out until I have the right weight, then I drill a hole in the top and feed the spectra around the center drum. This handles movement for two points in the articulated structure - the top point and the mid point. The lamps can be adjusted with very minimal force - two fingers to any position within their range.


In developing these stainless wire fittings for carbon tubes on both kites and lamps, I have really felt tested by the material. It is a real study in minimalism. These lamps have the smallest amount of wire that I could possibly use. What look like flourishes on the fittings are just clean ways to deal with the ends of wire that don't involve stabbing the user. The wire is both very forgiving, and totally relentless in the demand for precision. The annealing is absolute and wonderfully consistent when the wire first comes out of the can, but as soon as you commit to a bend that is beyond that limit, the wire hardens, never to return to the soft state that it started in. You have to work in one direction. There is no going back and adjusting certain aspects of the form.

The Flame at the Drop Zone

I love these shapes.

Sunday, November 29, 2009

Hold a Sky Photon by the tail

I made this Sky Photon a long time ago as a wedding gift for some friends. I finally got to spend some time with it over this long weekend. In spite of very poor quality wind, it was tied off to my back pack all day long. I had some fun with one of the only relaunches.

Tuesday, November 17, 2009

First work off the new pliers


Got my german surgical pliers today. Fantastic tools, and basically jewelry in and of themselves. This is a necklace I'm working on as another present.

Monday, November 16, 2009

Finished Necklace


This is a gift. For whom? I cannot mention here. Stainless wire, onyx and jasper.

Sunday, November 15, 2009

New Necklaces


Here is the start of a new design. This is about 25% of it. Higher quality shots to follow.

Saturday, October 24, 2009

Scan vs Photo


Recently Ruth and I have been in image capture hell. Or, to put it more mildly, we have learned a lot about what makes a good image capture. Here are two examples showing side by side crops at 100%. These are Ruth's original oil paintings on paper. They are about 25" x 15" overall. We need to capture for Ruth's upcoming book Lonely Bird's Friend. Of course it's obvious that a scanner is going to have higher quality than a camera if it is possible to use a scanner in a given situation. This experience really drives it home though.

Prior to seeing the scans, we were blown away by the image quality from our recent shoot on the Nikon. The right hand frame on each image here is from my Nikon D90 with a 50mm prime at f5.6 on a tripod and using diffused halogen lights. The left side is from a sheetfed scanner at 600 dpi, the right side is from the nikon at 300 dpi and 12 megapixels. To compare, the nikon's raw images are about 12-15 megabytes. The scans are 376 megabytes. So what's the catch? The scanner at our print shop is perfect in every way except it leaves banding and lines in the images making them unprintable–we think the scanner is out of adjustment. We go for an appointment next week to another print shop to try another scanner. High hopes for it.

Tuesday, October 20, 2009

Good advice, for some.


Don't fly kites near power lines. It is pretty good advice. Like many rules however, some can be bent, others can be broken. We often fly in our front yard. It has some really beautiful lines right above it. Getting close to them can be really photogenic.
Tim Elverston Ruth Whiting Lacewing Flame Kite

Ruth in the studio - nearing completion of the book


These are among the final images which have to be done to complete Ruth's book - Lonely Bird's Friend


Sunday, October 18, 2009

Finished lamp - carbon, stainless, spectra, cuben fiber


The makings of a counterweighted lamp

Two weeks ago I made this lamp. I'm working on the second. This one has a wooden base, the next one will be all carbon. This is a wall-mounted lamp that is counterweighted so it can be adjusted with two fingers to go anywhere within the 5 foot radius. It started with an idea for a bent wire junction.


Friday, August 21, 2009

Leather Jacket


In process, this is the first leather jacket I've ever made. I knocked off a patagonia jacket that I have and really like. The templates were very hard to get, so i used clear plastic to lay over the patagonia pieces. I traced the shapes onto the plastic, then I backlit them and traced them into paper templates. It turns out that I got the shapes within about 2 mm because the leather went together perfectly. I will post more images as I continue to finish this out. It's really soft, and not quite as shiny as this shot might suggest.

Tuesday, August 18, 2009

Raw silk shirt

I'm learning how to use this raw silk. It is a dream to sew. Amazing the way it takes stitching. I want to do gusseted dresses next.

Monday, July 27, 2009

Rust Wire Mobile

I made this when I was living in Australia. Ruth was taking a sculpture class and I was sitting around in the studio. There was a huge roll of this fantastic wire that had a really nice finish and took a curve really well. This was just a quick doodle and it came before this silghtly more complex wire mobile that I did from stainless steel.

Sunday, July 26, 2009

How to make Dust Goggles.

I made these goggles for the dust in the desert at Burning Man. I am posting these images as instructions for those of you who might want to try making some of their own.

Good goggles for the desert are hard to find and they are very expensive if you do.

These are made from an old leather jacket, and from two pieces of tempered and UV resistant glass that I got from the halogen 'puck style' lights. I popped the glass out of the plastic ring. They also sell tinted circles that can be used for torch brazing which would be great. I wanted these for night also, so I'm leaving them clear.

The whole process took about 3 hours. If you have any questions please email me. You can get the address from our website.


Here is the link to the main page on our site. How to make leather and glass goggles.

Tuesday, July 14, 2009

Silk is amazing

So I finally finished this shirt. The strength of this sheer silk is beyond belief. I must admit that I had no idea that silk was as strong as I'd always heard. Like many things in life, they don't make real sense until you experience them for yourself. I can't wait to make some more clothing from silk now. Between silk and merino, I think I have my fiber requirements for my clothing totally covered for life.

Tuesday, July 07, 2009

Painting - Ruth Whiting - Tell Someone

Near completion, this is Ruth's first painting in this series. It's called Tell Someone. It's 3.5' x 5' and oil on canvas, I love it.

Wednesday, July 01, 2009

Mike Emery's Razzle Dazzle Flame in Finland

This is a razzle dazzle Flame designed for and living with Mike Emery. It's Flame number 16. Ruth and I designed it with the idea of the world war I camouflage scheme for the british and american ships. This flame is cold, but seems very at home in the snow.

LaceWings and Metalwings


Shadow work with a Lacewing Flame by Tim Elverston and Ruth Whiting. Ruth Whiting's shadow. Jose Sainz's winged rokkaku. Spread Eagle stainless wings by Bryan Tedrick of Glen Ellen, CA. Photos by Ian Lauder. Perhaps out most amazing day at BRC last year 2008.

Tell Someone | new painting by Ruth Whiting

I personally love this new direction for Ruth's painting. These are a few shots of the new work she is doing. I find the story so simple and powerful. The final image will be rendered to a very fine degree. I can't wait.


No this isn't flash photography, Ruth is projecting a sketch as a guide in the above two images.

Tuesday, June 30, 2009

Our facebook page

Here is a little page on facebook where you can find some info about what we're up to.

WindFire Designs Facebook Page.

Saturday, June 27, 2009

Hand-tied iPhone Case

After resisting the urge to buy a case from the at&t store - I have a strong dislike of retail these days, I made this iPhone case using some scraps of kitesurfing kite bridle line. I figure it beats buying yet another thing with lots of packaging. Since having knots in this stuff in this context wouldn't work, I pierced through with a bridling tool and used spectra to bind it at the key points. This protects it well from being dropped on the corners, and stays out of the way of the controls and the invisible sensors on the front of the screen that sense brightness and holding it up to your face. Second gen might be sewn at the white points using the machine.


So, I couldn't stand it. I went through and replaced all the spectra with bar-tacks done with the sewing machine. Here is the design all cleaned up and nice looking.